Textured Chevron Crochet Blanket Pattern
![]() Today I am going to share with you the pattern that I wrote to make my crochet blanket. The stitch pattern was found on MyPicot - Crochet Textured Wave Stitch. I put together the numbers, wrote the instructions for making the blanket and put a step by step photo tutorial at the end of the pattern to get you through the first three rows. This blanket was very easy and interesting to make. The combination of basic stitches creates a very beautiful textured fabric (see my FO post). This is a perfect project for stash busting, as it allows you to work in multiple colors. I always love to have one simple project in progress that I don't have to think about too much and can pick up any time during the day when I have a free minute. It is a perfect companion to watch a good movie :)
Today I am going to share with you the pattern that I wrote to make my crochet blanket. The stitch pattern was found on MyPicot - Crochet Textured Wave Stitch. I put together the numbers, wrote the instructions for making the blanket and put a step by step photo tutorial at the end of the pattern to get you through the first three rows. This blanket was very easy and interesting to make. The combination of basic stitches creates a very beautiful textured fabric (see my FO post). This is a perfect project for stash busting, as it allows you to work in multiple colors. I always love to have one simple project in progress that I don't have to think about too much and can pick up any time during the day when I have a free minute. It is a perfect companion to watch a good movie :)
Textured Chevron Crochet Blanket
MATERIALSYarn. 100% cotton fingering weight yarn holding three strands together. 3 desired colors (A, B, C) The estimated yardage is approximately 1800-2000.Notes:
- I was using fingering weight yarn holding three strands together because it was a stash busting project. Three strands of fingering weight yarn approximately equal to one strand of light worsted weight yarn. The exact yarn weight is not essential in this project as long as you like the fabric that it creates.
- I used 100% cotton yarn, but you can experiment with different fibers - wool and wool blends, different cotton or acrylic blends.
- I was using three colors, but you can experiment with what your imagination and stash allows :) The blanket has a very rich texture which makes it perfect for working in solid color. You can choose to change colors every row, every other row or any color sequence you like.
- See the end of the pattern for the step by step photo tutorial
Crochet hook. 8mm (US - L)Note: Make sure that you adjust your hook size if needed to achieve the gauge or the fabric that you like. GAUGEThe exact gauge is not essential in this project. If you like the fabric in you swatch, but the pattern repeat doesn't exactly match the gauge, you can either add or subtract one-two repeats depending on what size you want your blanket.I would recommend making a swatch of 37 stitches (multiple of 16 + 5) and crochet 6-8 rows. This way your swatch will have two pattern repeats and you will get an idea of how it works.1 pattern repeat (16 sts) - 5¼" (13.5cm)1 pattern repeat (2 rows) -1¼" (3 cm)SIZEFinished Dimensions: 44.5" (113 cm) wide x 49.5" (126 cm) longNote: These are dimensions of my blanket. You can easily adjust the size of the blanket adding/subtracting rows or stitch repeats.ABBREVIATIONS/STITCHESch - chainsc - single crochetdc - double crochetFP sc - Front Post single crochet. Here is the YouTube video with the tutorial - How To Crochet a Front Post Single Crochet Stitch or go to the end of the pattern for the photo tutorial2dc decrease - work 1 incomplete dc in each of next 3 sts: yo, place hook in the indicated st, yo, pull through stitch, yarn over, pull through 2 loops (2 loops on the hook); yo, place hook in next st, yo, pull through stitch, yarn over, pull through 2 loops (3 loops on hook); yo, place hook in next st, yo, pull through stitch, yarn over, pull through 2 loops (4 loops on the hook); yo, pull yarn through all 4 loops for a completed decrease. Go to the end of the pattern for the photo tutorial4dc decrease - work 1 incomplete dc in each of next 5 sts: yo, place hook in the indicated st, yo, pull through stitch, yarn over, pull through 2 loops (2 loops on the hook); yo, place hook in next st, yo, pull through stitch, yarn over, pull through 2 loops (3 loops on hook); yo, place hook in next st, yo, pull through stitch, yarn over, pull through 2 loops (4 loops on the hook); yo, place hook in next st, yo, pull through stitch, yo, pull through 2 loops (5 loops on the hook); yo, place hook in next st, yo, pull through stitch, yo, pull through 2 loops (6 loops on the hook); yo, pull yarn through all 6 loops for a completed decrease. Go to the end of the pattern for the photo tutorialCOLOR SEQUENCEWork 6 rows in A, *work 6 rows in B, work 2 rows in A, work 6 rows in C, work 2 rows in A; rep from * 3 times more; work 6 rows in B, work 6 rows in A.Note: To change color, work last st of old color to last yarn over. Yarn over with new color and draw through all loops to complete st.INSTRUCTIONS Foundation chain: With A ch 133 (multiple of 16 + 5) = 8 pattern repeatsRow 1 (foundation row): Starting with fourth chain from hook (you skip 3 chains) make 2dc decrease, * 1dc in each of next 5ch, 2dc + 2ch + 2dc in next ch, 1dc in each of next 5ch, 4dc dec.; rep from* 6 times more; 1dc in each of next 5ch, 2dc + 2ch + 2dc in next ch, 1dc in each of next 5ch, 2dc dec., 1dc in last ch, turn.Row 2 (WS): 2ch, 1 FP sc over decrease st, *1 FP sc over each of next 7 dc below, 2ch, 1 FP sc over each of next 7 dc, 1 FP sc over decrease st; rep from* 7 times more, 1 sc in 3rd ch, turn.Row 3 (RS): 3ch, 2dc dec. , * 1dc in each of next 5 FP sc, 2dc + 2ch + 2dc in space of 2ch of Row 1, 1dc in each of next 5 FPsc, 4dc dec.; rep from* 6 times more, 1dc in each of next 5 FPsc, 2dc + 2ch + 2dc in space of 2ch of Row 1, 1dc in each of next 5 FPsc, 2dc dec., 1dc in 2nd ch, turn.Repeat Row two and Row three 39 times more or until the desired length.Work Row 2 one more time.FINISHINGTop Border: With A 2ch, 8sc, *sc in space of 2ch of row below, 15sc; rep from * 6 times more, sc in space of 2ch of row below, 9sc.Do NOT turn to the other side.Continue working sc around the side border: 3sc for each 2 rows.Lower border: work sc in each st acrossContinue working sc around the other side border: 3sc for each 2 rows.Fasten off.Weave in ends.Though MyPicot photo tutorial is great, I felt like a lot of steps were left out. You can choose following MyPicot tutorial or the one that I made. In my tutorial I am working you through the first three rows. Believe me, as soon as you get the idea of these first three rows, the rest will be super easy :) The stitch pattern only looks complicated, but in reality it is just a combination of basic "classic" stitches! In this tutorial I am using two contrasting colors for the demonstration purposes. If you want to see the bigger picture, just open it in the new tab. I tried to be as detailed as possible, if you still have some doubts left leave me a comment and I will explain it.
Photo Tutorial
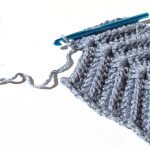
Row 1 (foundation row): Starting with fourth chain from hook (you skip 3 chains) make 2dc decrease.
![]()
2dc decrease
![]()
![]()
1dc in each of next 5ch
![]()
2dc + 2ch + 2dc in next ch
![]()
1dc in each of next 5ch, 4dc dec
![]()
![]()
Follow the pattern until the end of Row 1. This is what you get at the end. You can see that the zig zag started to form.
![]()
Row 2 (WS): 2ch, 1 FP sc over decrease st
![]()
![]()
![]()
![]()
1 FP sc over each of next 7 dc below
![]()
Work following the pattern. You will get again to FP sc over decrease st. This time it will be a 4dc decrease of the previous row. Work it the same way as the first one
![]()
This is how it looks like from the opposite (right) row - each stitch is wrapped up with FP sc
![]()
Work Row 2 until the end.
Work Row 3 following the pattern. You will get to the following instructions: 2dc + 2ch + 2dc in space of 2ch of Row 1.
![]()
![]()
Continue following the pattern
![]()
![]()
I really hope you will enjoy this pattern as much as I did.
Happy crocheting!
RELATED POSTS